Adjust White Balance of Digital Cameras…. to your preference
How could we adjust the WB of our digital camera? I’ve talked about this a while ago in my Travel Photo blog and thought it would be good to recap it here to let general photography hobbyists know about this as well.
WB exists only in digital camera. Digital camera converts analogue lights received by its image sensor, into digital coloured image. Different colours are being calculated back digitally based on the whitest point in an image which would be considered as white. However, white will appear too yellowish under halogen and too greenish under fluorescent due to their different colour temperature from different light source. This is when the WB setting of our camera comes in. WB is a feature of digital camera (film cameras convert lights into colour by chemical reactions of film, not camera) to adjust its white point colour temperature to adopt the different ambient lighting so to tell image processors in digital cameras that the yellow under halogen lighting, or green under fluorescent lighting should appeared as white, and so on. Only then you can see from the photo what actually you have seen it in actual scene. While Auto WB setting is the camera technology to adjust its colour temperature intelligently to adopt different ambient lightings. However, under some complex lighting environment, AWB function of digital cameras could be fooled sometimes.
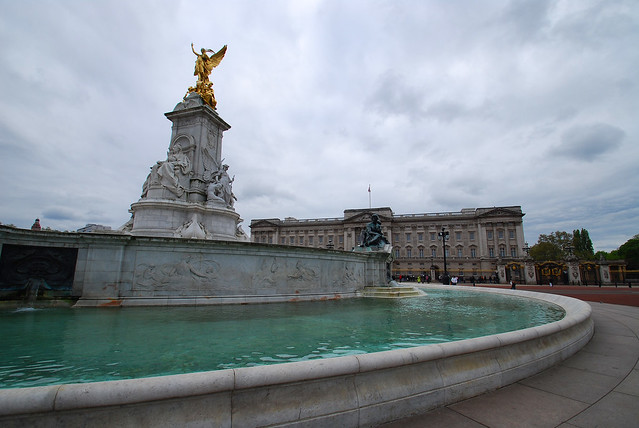
When the sky is overcast with thick clouds, the colour temperature is higher than it appeared and what camera RGB sensor expected . In this case, AWB would think the scene is too warm and adjust White point of the scene to a much higher colur temperature and the image will appear bluish than what is seen by our eyes. Take a look at the above photo. It is supposed to be an attractive shot of the Victoria Memorial with Buckingham Palace as background. But the overcast weather had actually ruined the image with dull colour by using AWB setting to shoot.
Firstly, the image is still slightly under exposed eventhough I had increased the Exposure Value by +1/3 stop. Secondly, the White Balance is out. This problem happened to many of my travel photos under overcast weather. The overall image appeared to be too bluish to what I saw in actual. The rapid change of weather with intermittent sunlight and cloudy had made selecting WB by my Nikon D60 difficult. Switching to Daylight preset WB may be perfect for one shot but may not be for the next if the weather changed.
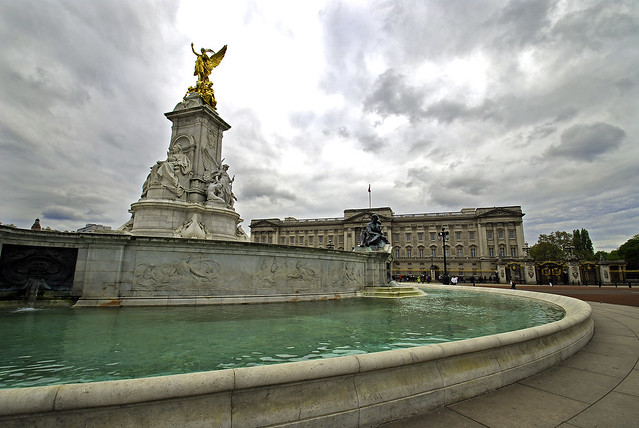
The same problem happened if we thought of selecting Cloudy preset WB for this scene but the complex ambient light from the overcast sky and pool water reflection had fooled the Nikon RGB sensor and the image appeared to be much yellow than actual, as shown in the above photo. But some may prefer this as it shows warmer and more dramatic colours! Stick with it if you like it, WB is nothing right or wrong, it’s just a matter of personal preference.
For these kind of weather on your travel, the best WB setting I would prefer is still be the AWB, if you are shooting JPEGs (If you are shooting RAW, forget about the WB setting as you can select the destined colour temperature at a later stage). Set WB setting to AWB and shoot all the way! Leave the colour correction at a later stage by adjusting colour temperature of the image with either CS5 or Lightroom 3, to whatever colour temperature you prefer…
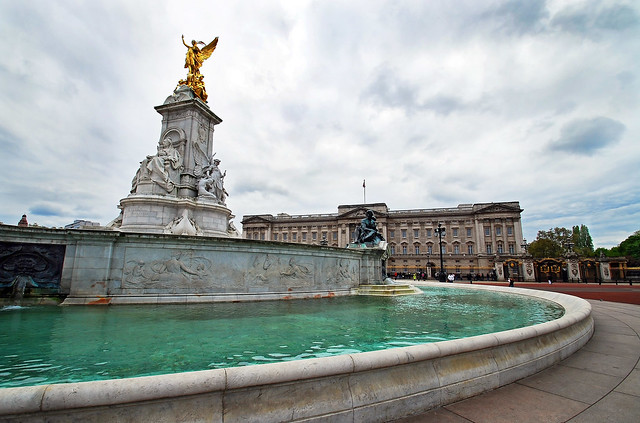
The above photo is the result of what I adjusted during post processing with Photoshop. By increasing the brightness and reducing the colour temperature, this was actually what I’ve seen for the Victoria Memorial of London, with some degree of increase in colour saturation for more attractive colours.
Conclusions? WB setting is critical for photo shooting under one fixed ambient lighting, like studio or museum shooting. Pre-set your camera WB using a white or grey card will easily produce a set of perfectly coloured photos collection that is ready for printing direct from camera. However, if you are shooting outdoor travel scenes, especially in a travel destination that have fast changing weather, like London in Spring, switch your camera WB setting to AutoWB. It would be easier and faster to shoot using AWB to get good result for most of the photos. Then play around the slider of Photoshop to adjust the image colour temperature, to what you prefer, not necessarily to what you’ve seen in actual. And this is the most useful purpose of adjusting White Balance. 🙂 – Cecil Lee Photography, the ultimate photography blog


For me, I set my camera to AWB. Whatever need to be done I will do it in Photoshop later. 🙂